
Back-ups are a bit 'special' compared to regular neighborhoods. The biggest difference between them is that back-ups can't be played in the game, while regular neighborhoods can. Sounds like a disadvantage for back-ups, but it actually protects your neighborhood a bit too: the game can't modify the back-up. Also, neighborhoods can't be zipped and password protected: back-ups can be. And uninstalling The Sims sometimes removes your neighborhoods. But it won't remove your back-ups, so you can continue where you left off when you reinstall The Sims!
To create those great back-ups, choose the "Create back-up" option in the main screen (Chapter 3). Make sure you select the slot to put the back-up on too! When you click the "Continue..." button, you will see this screen:
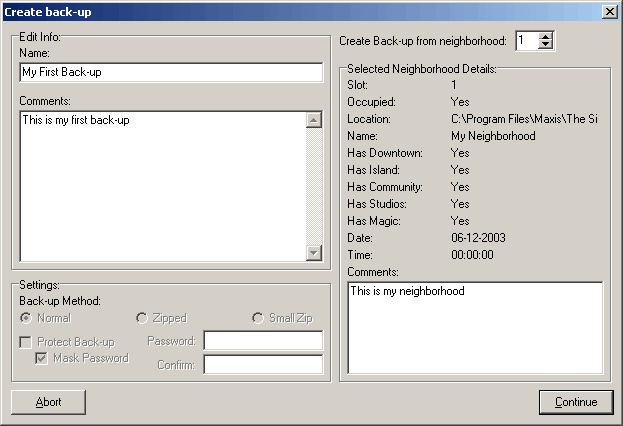
This may look like you have a lot to do, but it's not very much
actually. In fact, entering the name and comments of the back-up
can be enough. If you have an expansion pack for The Sims installed,
then you must also select the neighborhood number you want to
create a back-up of. You will see the details of that neighborhood
on the right part of the screen.
Depending on your options, you may also be able to select the
back-up method. Otherwise, the default one is checked. This can
be the following options:
| Method | Description |
|---|---|
| Normal | Makes a copy of the neighborhood files, stored as files (not zipped) |
| Zipped | Makes one zip-file of the neighborhood files. This can be protected. |
| Small Zip | Makes one zip-file of only the necessary neighborhood files (export files for families - only necessary for the Exchange, not necessary for the neighborhood itself, web pages and photo album will NOT be included!). This can also be protected. This back-up method should be used if you're low on free disk space. It can save up to more than 75 Mb per back-up compared to the Normal method! |
The Zipped and Small Zip method can be password protected. Make sure you read the protection notes (Chapter 23) for some important information about this. If you want to protect the back-up with a password, check the "Protect Back-up" option. As this cannot be done with the Normal back-up method, that box will not be available when that is checked (or when Normal is set to the default in the options). Type the password in the password field, and type it again the the Confirm field to make sure you didn't make any spelling mistakes. Keep the password in a safe place! Do NOT forget it, or you won't be able to access your back-up anymore! If you check the "Mask password" box (which by default is checked), then the password will be replaced with asterisks (*) while typing. If you want to see the letters/characters you type, then uncheck the box. Make sure nobody is watching with you as they can see the password then!
To continue making the back-up, simply click the Continue button. If a back-up already exists on the selected slot, The Neighborhood Handler will ask you if you want to overwrite it. If you overwrite it, the old back-up will be lost and unrecoverable. If the existing back-up is password protected, then it will also ask for the password before overwriting the back-up.
Once the files have been copied, or when you click the "Abort" button to stop making the back-up, you will be taken back to the main screen.
Related Chapters: